Signature background removal
How to Remove Background from a Signature
To remove the background from a signature, start with a clear image of the handwriting, remove the surrounding paper, then download a transparent PNG. Check every thin stroke before putting it in a document: a transparent background is useful only if the writing remains readable.
- Use a sharp scan or photo with even light and keep the original.
- Inspect faint strokes, dots, and gaps before accepting a cutout.
- Download PNG; converting a JPG to PNG alone leaves the paper in place.
1. Prepare a clear signature image
Use handwriting you own or have permission to process. Scan the paper, or photograph it square-on in even light. Crop out unrelated text and objects while leaving space around the strokes. Keep the full original separately so you can try again if the crop is too tight.
Zoom in before uploading. Faint ink, motion blur, and a heavily compressed JPEG can make the boundary between paper and handwriting difficult to identify. A clearer capture is often more useful than repeatedly processing a damaged input.
Dark ink on light, neutral paper is the input covered by the sample below. Colored ink, textured paper, and overlapping stamps need their own checks; this example does not establish how they will perform.
2. Upload and compare the transparent result
Open RemoveBGKit and choose Pick image to process. Upload your image, then compare Original with Transparent PNG after the task completes. The published sample was processed using auto mode and pro quality.
Open Preview and inspect the whole signature, especially the light ends of strokes. A missing dot or broken loop can be easy to miss in a small thumbnail. The website has no manual restore brush, so keep the original and use a clearer capture if important writing disappears.
- Letters, dots, and narrow connections remain visible.
- The paper surrounding the handwriting is transparent.
- Gaps between strokes do not contain unwanted paper residue.
What our actual production sample shows
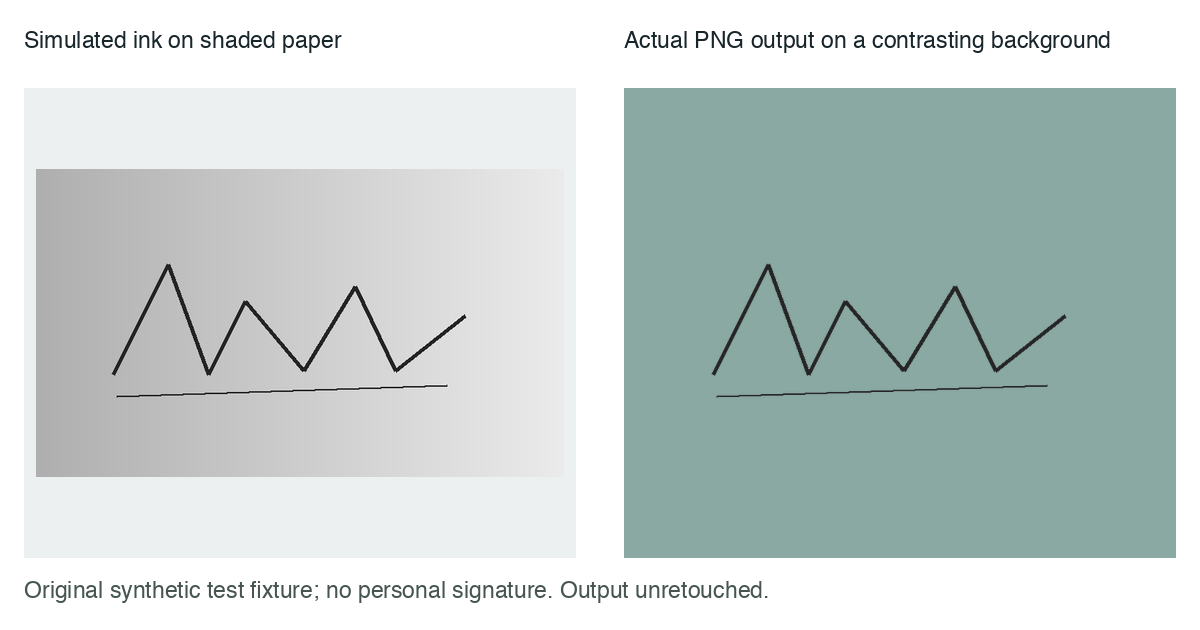
On October 7, 2026, we submitted an original synthetic ink fixture to the live RemoveBGKit service. It contains dark lines on a neutral paper gradient, including a thin underline. It is a test pattern rather than a real person's signature.
The input and output were both 720 by 420 pixels. The output corner was fully transparent, and its maximum alpha was 255. Every measured dark interior input pixel had output alpha above 128. We defined dark pixels as those whose largest RGB channel was below 100, excluding a four-pixel image border.
That measurement checks retention of the darkest pixels. It does not prove that every antialiased edge, faint stroke, ink color, or paper texture survives. The downloadable output is unretouched; the comparison image only resizes it and places it on a contrasting green background.
The sample was processed in auto mode with pro quality. This is one verified result, not a guarantee for arbitrary handwriting or a comparison against other services. This guide was prepared by the RemoveBGKit product team, with AI assistance and a review against the actual processing record. Contact support@removebgkit.com with corrections or questions.
Download the original simulated ink image

Download the actual transparent service PNG
Read the processing record and output SHA-256
| Measurement | Observed result | Scope |
|---|---|---|
| Dimensions | 720 x 420 pixels | Input and output of this fixture |
| Corner alpha | 0 (transparent) | Top-left output pixel |
| Maximum alpha | 255 | Most opaque output pixel |
| Measured dark ink retained | 100% | Input max RGB < 100; four-pixel border excluded; output alpha > 128 |
3. Download PNG and check the final background
Choose Download beside Transparent PNG and save the file promptly. PNG can store an alpha channel, which allows the area around the writing to be transparent. JPG does not preserve that transparent background.
Place the PNG on the background where you intend to use it. Check both a light and a dark surface: pale paper residue can blend into a white page, while a contrasting background can reveal a halo or broken strokes. Inspect the image at its intended display size as well as close-up.
Keep the downloaded PNG as your reusable image. A screenshot of the preview may include its checkerboard or display background, so use the actual download when you need transparency.
Why does the signature still have a white box?
A PNG filename does not guarantee transparent pixels. If you converted a JPG to PNG without removing the paper, the original white area remains. A viewer can also display a genuinely transparent PNG against white, making it look opaque.
Try the file on a colored background. If a rectangular white area stays visible, check that you downloaded the processed result rather than the original. If only a pale edge remains around the writing, inspect that edge separately rather than assuming the whole file is opaque.
If the handwriting is faint or incomplete after processing, return to the original. Do not accept a damaged cutout just because the paper disappeared.
Check the trial and credit cost before processing
RemoveBGKit offers a trial before paid credits. Read the current trial allowance and credit cost shown in the tool and pricing page before submitting. This guide does not describe unlimited free processing.
If the image is part of a sensitive document, crop out unrelated personal information and review the privacy policy before uploading. Keep your source files and final downloads in a location appropriate for that document.
A transparent signature image and a signing workflow
This process produces an image of handwriting. It does not itself provide identity verification, a signing record, or a certificate. When a document service requires a prescribed signing procedure, follow that procedure rather than treating a transparent PNG as its replacement.
For a design or document that accepts an image, use the inspected PNG and keep the original capture. If you need to process a different type of artwork, the Logo guide explains how to check lettering and intentional white details.